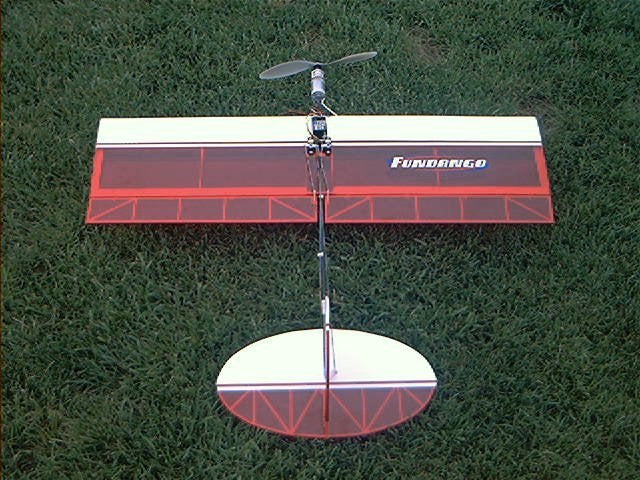
| | Specifications:
|
Since this is my first review for the E-Zone, allow me to introduce myself. My name is Kevin Petrilla. I have been involved in R/C since late 1993. My initial interest in the hobby was with glow aircraft. I still have some, but lately my interest has shifted significantly into the electric realm. I quickly became the electric guy at the field. My glow fuel consumption was ¾ of a gallon last year, which is down from about ten gallons a year from previous years. Like many of you, I find electric aircraft to be more exciting, challenging, and a little less messy.
I should state that for the purpose of this review, the airframe, power system, battery, servos, and covering were supplied by the manufacturer/distributor.
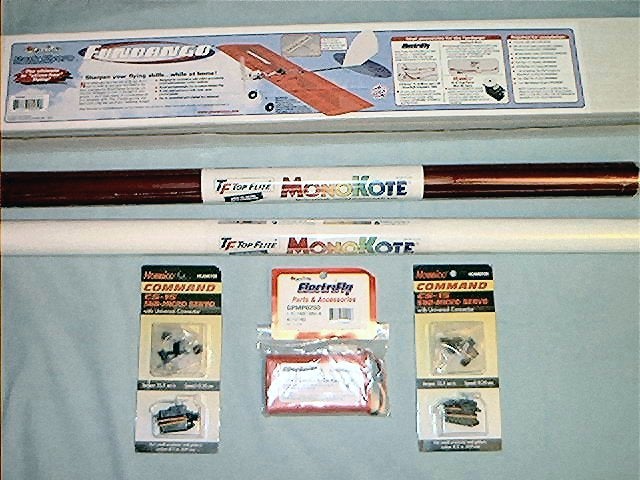
Instruction manual and plans
The first thing I do after opening the box is to pull out the instruction manual and read it from cover to cover. The instruction manual is typical Great Planes quality, being easy to read and having excellent construction pictures. There is also a lot of information regarding equipment selection and building notes. After reading the manual, I pulled out the plans and went over them as well. Again, the plans are of very high quality and are easy to read. The plans are on one sheet and all information is on one side, which is a definite plus.
Kit contents

Construction
Building the wing
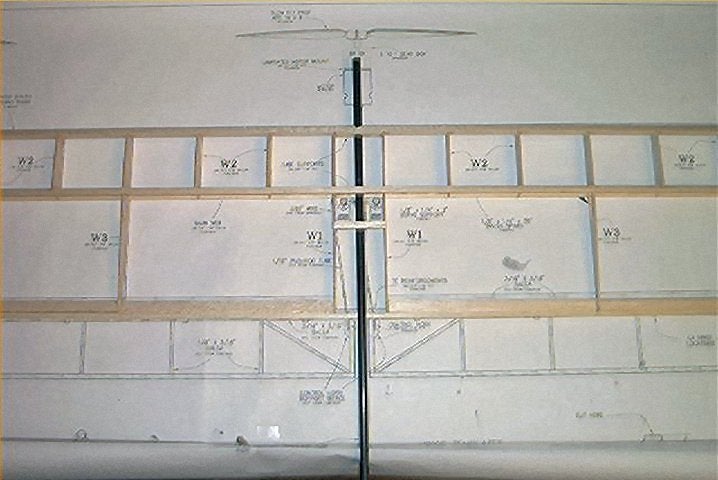
After checking to make sure all parts were there, I began to construct the wing. The wing construction is rather simple and very effective. The vertical sheer web is one piece and the ribs are twisted and "locked" into place on corresponding notches in the web. The notches ensure correct alignment and spacing on the main web. After the ribs are attached to the web, the bottom spar is added to the assembly. Next, eight half ribs are added to the front of the web spar assembly. There are only six full ribs that make it from the front of the wing to the trailing edge of the wing. Next, the leading edge, the bottom spar, and trailing edge are glued in place. Pieces of 1/16 x 1/2 inch balsa are glued in place next in order to form an inner frame on the sides and trailing edge of the wing. Plywood supports for the fuselage tube are now added to the wing. Before the fuselage can be attached, a hole is drilled in the leading edge of the wing and a notch is cut in the trailing edge of the wing. Now the fuselage tube can be test fitted. The first thing that crossed my mind the when I picked up the fuselage was how heavy it was! The fuselage is made from heavy fiberglass tube, which could potentially be substituted for significant weight savings. It should be easy to substitute a hollow carbon fiber shaft in place of the fiberglass shaft. At this stage, wing construction is almost finished. The next steps consist of framing up 3/16 x 3/16 inch balsa sticks to form the ailerons and then adding control horn support braces to the structure. My total building time to this point was just over two hours. Although the wing is simple to build, it became evident during construction that it would be sufficiently strong. The only problem I encountered while building the wing was a small problem with the die cutting of the ribs. The die cutting was a little shallow and it took some extra time with an Exacto knife to relieve the parts from their sheet. In addition, some of the ribs and web were cut from varying densities of wood.


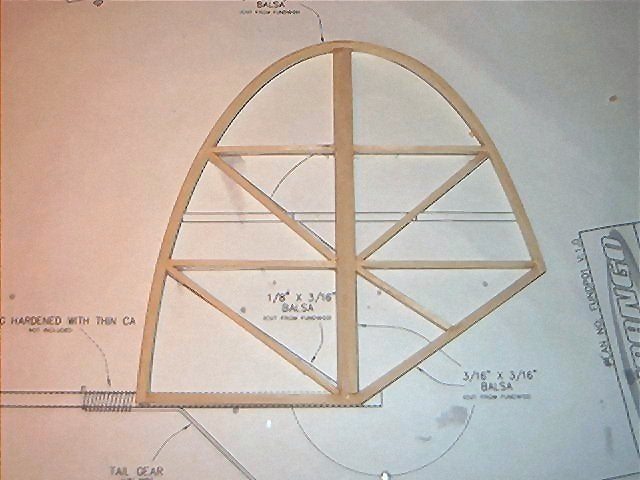
Building the tail surfaces
This is where the kit gets interesting! Unlike some kits where the frames of the tail surfaces are built first and then supported with inner structures, the tail surface supports for the Fundango are built first and then framed with laminated balsa strips. I started by gluing 1/8 x 3/16 balsa sticks together over the plans to form the inner cross brace structure for the fin. Once the inner structure is completed, you "move through the steps of wrapping the laminated frame of the fin." Ok, this does not look easy I thought, but for the sake of the review, I must do it as they say. T-pins are placed along the inside perimeter of the fin detail on the plan. Three 1/16 x 3/16 balsa sticks are glued, one at a time, to the outside of the framework while following the outline created by the pins. Glass cleaner with ammonia is used to wet the wood in order to help it soften so it could be bent around the framework.
The pins sounded like a great idea, but as I began to laminate the framework, they were putting small creases in the wood, which did not give the appearance of a smooth curve. I began to wonder if the pins were even necessary since it seemed so easy to bend the wood and glue it to the framework. I removed the pins and re-laminated the section I had previously started, following the curve on the plan as I went. I was rewarded with a nice smooth curve and it was much easier than it looked. Two more strips of balsa were then laminated to the outside of the previous lamination using thin CA. I deviated from the directions slightly at this point. I knew that I would be using the landing gear on my Fundango for taking off, so I incorporated a rudder into the fin. I placed one extra vertical support in the fin right next to the one already called for on the plans. After the fin dried, I cut the fin in half between the two vertical posts, thus creating a fin and rudder.
The horizontal stabilizer is created with the same techniques as used above for the vertical fin. After a complete stabilizer unit is built, the elevator is cut free from the stabilizer.
The process of gluing three consecutive laminations together does add a little extra weight to the tail surfaces, but it also adds strength, which would prove important during the covering process. There might be a tendency to skip the laminating process for a more convention construction method, but it is not necessary.


Assembling the fuselage
Even though the fuselage is just a tube, there are some steps necessary to prepare it to be used in this model. First, a slot must be cut into the rear of the fuselage in order to "slip" in the vertical fin. A Dremel tool with cut-off wheel proved perfect for this step. The fin is then temporarily installed and the tube inserted into the wing in order to set the correct alignment between the fin and wing. Next, a small wooden dowel is glued into the front of the fuselage. This will eventually serve as the mounting surface for the motor mount. Trailing edge reinforcement plates are installed now in order to secure the fuselage in the center of the trailing edge of the wing. I then sanded the front of the fuselage and mounting dowel at an angle to provide the proper down thrust for the motor and gearbox.
I then came to a part in the instruction manual that said, "building the landing gear (optional)." There was no option. I needed gear! Besides, who wants to land on a 10-inch prop that does not fold? The gear is fabricated from 1/16th inch wire that is bent to the specific angles that are outlined on the plans. The main gear is then cut in half and inserted into holes that are drilled in the side of the fuselage tube. The gear is held in place by wrapping string or thread around the gear and fuselage and then gluing the whole thing in place. The tailskid is attached near the end of the fuselage in the same manner as outlined above. The gear seemed a little flimsy, but only time would tell.


After completing construction of the sub-assemblies, I only needed to cover and assemble the model. After sanding the airframe, I began to cover it with Monokote. I will not go into the covering, but I will say that applying the transparent red Monokote proved to be more difficult than the white that was supplied. I have been covering models with Monokote for over eight years and this was only the second time I have had even the smallest problem. To put it simply, the red just did not seem to want to shrink that easily, but the white was perfect. After the model was completely covered, I began to put it all together. A battery hook is fabricated from leftover wire, which is installed in a hole drilled just in front of the wing leading edge. A rubber band is then stretched from the hook to the fuselage tube just behind the main wing's trailing edge. When installed, the battery fits between the wing and the rubber band. The ailerons, rudder, and elevator are easily hinged and installed. Next, the control horns and wheels are installed. The airframe was complete and it finally looked like a Fundango.


Mounting the motor and radio system
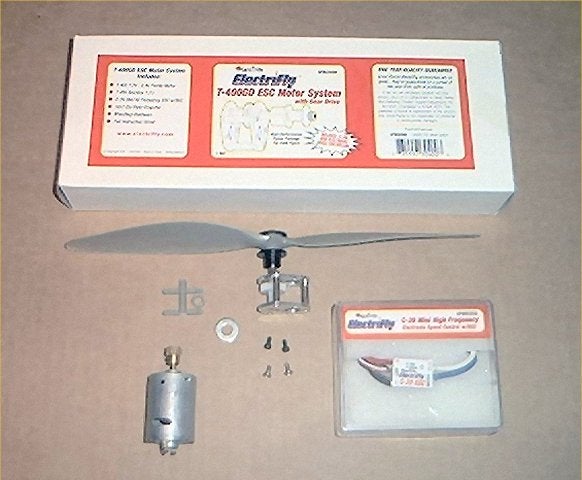
Note: The manual that I received says the Electrifly-400GD system includes a T-400motor, 3:1 gearbox, and 10x6 prop. The Electrifly system as provided for the review included a speed 400 motor, a 1.7:1 gearbox, and a 10x7 prop.
The motor and gearbox were attached to a motor mount that was assembled from two 1/16th inch pieces of plywood glued together. The only problem was that the screws that were supplied to connect the box, mount, and motor were too short. I went to my "junk box" to find longer screws. After the gearbox and motor were attached to the mount, I attached the ESC to the motor. This whole assembly was then screwed into the dowel in the front of the fuselage tube. The indicted thrust angle was then set with a spacer made from leftover balsa. A strip of tape was wrapped around the motor and fuselage to hold everything securely. I then installed the 10x7 prop.
Mounting the servos consisted of placing them in their respective spots and securing them with screws. Although the instructions say to place the receiver in the wing through the servo bay, I opted to mount mine on the top of the wing for easy access.
Here is where it gets interesting again. The pushrods are made from 1/16th aluminum tube and .76mm wire. The wire is cut and then glued in the ends of the aluminum tube. After the wire is glued in the tube, Z bends are added to the wire to form the completed pushrod. It sounds easy and it was, but I would not trust these rods to push a housefly out the front door. First off, they proved to be too flimsy. Secondly, the wire used in for the pushrod was smaller in diameter than the holes in the servo arms thus creating slop in the linkages. The picture used to depict this construction sequence in the instructions clearly showed that their wire had slipped from inside the aluminum tube. (Page 20. Photo 12) I definitely did not want mine to slip. I decide to go with a single piece of a larger diameter wire. I cannot recall the exact size, but I took my servo horn to the local hobby shop and matched the diameter of the hole. Early in the review, I stated that I added a rudder to the fin. While I did add a rudder, it is activated with the aileron servo. I ran a third control rod from the aileron servo to the rudder. When right aileron input is given, slightly less right rudder is given at the same time since it is connected farther in on the rudder control horn. I also added a pushrod support half way down the fuselage to keep the pushrod from buckling. Now that everything was now ready to go, it was time to get ready to fly.


Preparing the Model for Flight
The model was balanced 3-1/16th inches from the leading edge with the battery pack installed. The battery pack had been slow charged the night before so it was already charged. I hooked everything up and set up the control throws to one inch up and down on the elevator, and a half-inch up and down on the aileron. I put the battery on the peak charger to charge the pack to capacity so I could do some static testing.
Static Tests (Recommended Motor System)
Having been involved in e-flight for some time now, I initially felt that the recommended power system just did not seem right. The 1.7:1 gearing seemed very low for the recommended 10x7 prop and it was! Here are the readings for the recommended setup, all of which were taken with an AstroFlight WhattMeter.


| Cells x 8 | AMPS | Watts | Initial voltage | Voltage drop |
| 700 AA | 15 | 99 | 10.5 | 6.8 |
| 500 AR | 20 | 150 | 10.7 | 7.4 |
The numbers looked good, but not for a speed 400 motor. The problem is that much of the "power" is being used to heat the motor. The motor was so hot that not only did spit sizzle, it boiled away almost immediately. I knew I was pushing my luck at this amperage, but since this was Great Planes recommended system, I took it to the field.

Flight Tests

Electrifly Test Flights
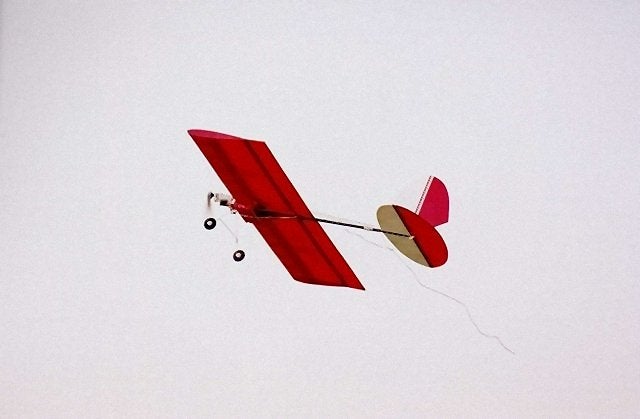
Once at the field, I took the obligatory flight line photos and prepped the plane for flight. I set the plane on the runway and slowly applied power. The Fundango came on step and lifted the tail surfaces in about 15 feet. It was off in just over 20 feet. After liftoff, it immediately wanted to nose down. I kept feeding in up trim until it leveled off. After I had it trimmed and flying level, I began to feed it more throttle. The extra throttle seemed to have no effect. It had enough power to fly, but that was about it. I slowly gained some altitude so that I could get a feel for its flying characteristics. After a longer than anticipated climb to "three mistakes high," I pulled the power back to get a feel for its slow flight characteristics. The nose dropped almost immediately without any snapping tendencies. I knew that I would need some power in order to bring it in for a smooth landing. Next, I tried a loop. It would not loop from level flight, so I put it in a shallow dive and tried a loop. The loop was easy with no tendencies to snap out of it at any point. I then gained a little more altitude to try some rolls. The low rate rolls were uneventful and slow. There was a small tendency for it to slow in the roll as the battery reached the top and then speed up as the battery came back around to the bottom. The high rate rolls were better as they had a much more fluid motion throughout the roll and happened much more quickly. At this point, I had been in the air less than 3 minutes when the BEC kicked in. I pulled the throttle back and then advanced it slowly to get some power back to the prop. The Fundango settled in on the gear and then proceeded to go up on its nose as the gear collapsed under it. I picked the plane up off the field and the gear sprung back to its original position. The motor and battery were extremely hot! There was only one word to describe the first flight, disappointing.
While the battery and motor were cooling down, I decided to see why it took so much up trim to get it to fly level. I initially thought that the center of gravity was off. However, after testing it again twice, I felt confident that it was right on. At this point, it became very evident that all that down thrust was pulling the nose down thus forcing me to dial in all that up trim. I wanted to change the thrust angle, but I did not have a way to do it at the field.
For the second flight, I switched over to the 500ar pack. I knew that the amperage was very high, but I wanted some extra power. The second flight was a little better. It lifted off and got onto step quicker. It could now just barely loop from level flight and the rolls were a little crisper due to its increased flight speed. I was a little happier, but not much. The BEC kicked in rather quickly. I had been in the air only about 2 minutes, but I knew it would not last too long on the 500ar pack. It was beginning to get dark so I packed up and headed home.
Overall, I was disappointed, but I felt that this airframe could be fun if it had the proper power system. I subsequently flew the recommended motor combo with a 9x6 electric APC prop. Although the plane did pick up some speed, the thrust seemed down. It flew similarly to the original combo, but flight times were up. Here are the numbers with the 9x6 prop.
| Cells x 8 | AMPS | Watts | Initial voltage | Voltage drop |
| 700 AA | 11.8 | 78 | 10.7 | 6.7 |
| 500 AR | 16 | 128 | 11 | 7.8 |
SpeedGear 480 Test Flights
I had enough of the recommended power system; so I went with something I felt would do this plane some justice. It was time to put the fun in Fundango. I went with the Graupner SpeedGear 480 from Hobby Lobby. It consists of a speed 480-race 7.2v motor and a 3.34:1 gearbox. I used the APC 10x7 prop that came with the original power package and some 8x800ar cells. I also removed almost all of the down thrust that was originally put in the motor mount. I ran the numbers to get a feel for what was in store and here is what I found.
| Cells x 8 | AMPS | Watts | Initial voltage | Voltage drop |
| 800 AR | 18.8 | 167 | 11.1 | 8.6 |
| 950 AAUL | 17 | 139 | 11.3 | 7.8 |
The numbers looked very promising so I packed up and headed to the field. The initial flight with the new combo was inspiring. It took off in less than ten feet and climbed with authority! Before the flight, I set the elevator back to neutral since I had taken out the down thrust. This proved to be right on. Now, only a small amount of up trim was needed to fly level. Loops were now very large. There was no need to dive for speed anymore. Rolls were also much improved due to increased speed and thrust. I now felt more confident behind the sticks. I tried multiple loops, rolls, Cuban 8's, Immelmans, and whatever else I could think to try. Flight times were also longer because there was no need to run at full throttle constantly anymore. To say that I was now excited was an understatement.
Comments and Conclusions
First, I would like to comment on the quality of the additional components that were provided for this review. The Great Planes CS-20 ESC that was provided was a big highlight in the flight of the model. It performed flawlessly. It is easy to operate, comes with a switch, and provides exceptionally smooth throttle response! The Hobbico CS-15 servos also performed as intended in this setup. The provided battery pack proved to be adequate for this application. It had some limitations due to the high current draw. If it were to be used in lower power applications, I am sure it would perform somewhat better.
The Fundango is a low hassle, fun to build airplane. Some of the building techniques used might be different from what some of us are used to, but they proved to work fine. I would not recommend the suggested power system. However, if you are looking for an aerobatic fun-fly type plane, the Fundango definitely fits the bill with a motor system upgrade.


No comments:
Post a Comment